Friday, June 19, 2009

Wild Herb Spread (based on traditional pesto)


You need

1 clove garlic
2 big pinches salt
2 cups foraged greens, torn up and loosely packed *
1/4 cup olive oil
1/2 cup cashew nuts
1/3 cup grated parmesan cheese

To make
Pound garlic and salt in a mortar.

Gradually add greens, continuing to pound.

Gradually add oil and nuts, until you have a smooth, thick paste.

Stir in parmesan.

Alternatively, use a blender for all ingredients except the parmesan, which you still stir in at the end.

Enjoy on crackers or pasta, or mix with sour cream to make a dip.

Makes over 1 cup of paste.


Notes:
Chickweed will make an especially creamy paste. Soak the cashew nuts for a few hours first to increase the creaminess even more.

Thursday, January 29, 2009

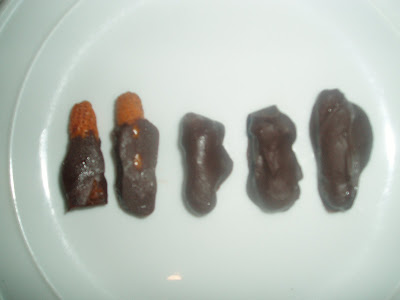
Chocolate-coated kawakawa berries

I'm quite ridiculously proud of myself for thinking of this idea, although I'm sure I'm not the first! Kawakawa berries - which are adorning many female kawakawa bushes around Wellington at the moment - taste to me like a cross between passionfruit and hot black pepper. And they go beautifully with dark chocolate.


You need
Kawkawa berries (as many as you can gather)
Dark fair trade chocolate (as much as you think you'll need to coat the berries)

To make
Very gently rinse the berries. You'll probably also want to pull out their long, thin cores. If you pinch them at the top of the berry and pull upwards, they slide up out of the berry quite easily.

Melt the chocolate in the top of a double boiler. (Or improvise with a bowl over a pot of boiling water.)

When the chocolate is fully melted, turn off the heat.

Gently roll each kawakawa berry individually in the chocolate. You can be quite extravagant with the chocolate if you like - the strong, unique taste of the berries can handle it.

After rolling each one, place it on wax paper to set.


To serve
I reckon these would be nice as an accompaniment to coffee. (Just one or two per person).

I also think they'd work well as a garnish on cheesecake - or on kawakawa icecream.

Or you could ad a few to a plate of chocolate dipped strawberries.

More about Kawakawa berries
I've been excited to find that they ripen to some extent off the bush. Don't pick the completely green ones - they won't ripen well. But if they're starting to blush orange, they'll complete their ripening quite easily sitting on your shelf or table or windowsill.

I'm not sure exactly how long they keep for, but last week I picked some half-ripe ones on a Monday afternoon, kept them on a shady shelf, and they were still good (and completely ripe) by late Thursday night.

I have an entry about kawakawa at Wild Picnic.


Friday, January 23, 2009

Puha Pakoras

Actually you can make these from any foraged greens, but puha lends itself especially well. (And I like the alliteration.) If you are using big stalks of puha, while you wash it, bruise the stalks a bit to let the bitter white sap out.


You need
1 cup chana (chickpea) flour

1.5 tsp curry powder or cumin

½ tsp baking powder

½ tsp salt, or to taste

Big pinch chilli powder (optional)

2 cups foraged greens, finely chopped and loosely packed down.

2 tbsp grated onion

Water

Oil


To make
Whisk dry ingredients together.

Add greens and grated onion.

Mix to a very thick batter. If necessary, add water to moisten slightly - but only slightly! The dryer this batter the better. You should only need a few drops of water, if any.

Heat 1 cm oil in pan, on medium-high.

Dollop in small spoonfuls of batter, or mould small patties in your hands and drop in. (Keep hands wet if doing it that way.)

Turn and fry till golden brown on both sides.

Remove onto paper-towel-lined plate.

Serve with yoghurt and/or relish.

Makes a meal for 2 or a snack for 4.


If using bitter greens ...
If you're using very bitter greens - like older dandelion leaves or wild mustard greens - boil them for 5-10 minutes and then leave to drain before chopping them and adding them to the batter. (You may even want to press some of the moisture out, so you don't risk ending up with an over-moist batter.)


Friday, December 19, 2008

Sugared rose junket

As with the basic junket recipe below, you can of course use a different kind of rennet, and adapt the temperatures and quantities to that.


You need
A small handful of fragrant rose petals (if in doubt, try less rather than more, to start with)
2 cups milk
Caster sugar
Mild-tasting honey (optional)
Vanilla to taste
Curds and Whey vege rennet
A thermometer


To make
Add the rose petals to the milk, and heat it gently in a pot to a scalding temperature. (Till little bubbles are just forming round the edges, but it's not simmering.)

Take it off the heat, cover it, and let it cool to 31 degrees.

By that stage the roses should have released a lot of colour and fragrance. (I love seeing how the petals fade.)

Strain the rose petals out.

Quickly mix in two BIG teaspoonfuls of either caster sugar or mild honey, till dissolved.

Add a drop (or 2 or 3) of vanilla and quickly stir.

Mix a couple of drops of rennet with a tsp of water.

Stir the rennet/water into the milk for 15 seconds or so.

This is your junket mix. Pour it into wide shallow bowls or glasses and leave to set.

Don't move the junket at all while it's setting. That can break the curd.

Once it's set you can refrigerate it. (Not before.)

Just before you serve, sprinkle a good coating of caster sugar over the surface. I don't know what it is, but this makes all the difference - the rose junket goes from being 'interesting' to 'completely delicious'.

(The sugar is the reason to make this junket in a wide shallow bowl - so that you have more surface area to sprinkle sugar over.)

Eat it straight away before all the sugar has become syrup. The crystally texture of the sugar is key!


Extras
* This rose junket is a great accompaniment to fruit salad. It's also nice served with a garnish of fruit and edible flowers such as borage or calendula petals. (I especially liked it with bananas and strawberries.)

* You can make moulded junket by lining your bowls with baking paper or waxed paper before pouring the junket in to set.

When it's set and refrigerated, put the plate flat over the top of the bowl and turn it very gently upside down. The junket will come out with the paper still on it. Then just gently peel the paper off.

Then you have EVEN MORE surface area for the sugar.

(And hopefully you can do a better job than me at getting the paper unwrinkly before pouring the junket in - see pic above!)

Saturday, December 13, 2008

Basic junket

Junket is a delicious dessert, as well as classic invalid food.

It's great for subtly showcasing the flavours of the honey you use, and it's fun to experiment with different honeys.

For rennet, I use curds and whey vege rennet, but any kind will do of course. Alter the temperature and quantity according to the instructions for your own rennet.


You need
2 cups milk
2 big teaspoonfuls of honey
Vanilla to taste
Curds and Whey vege rennet
A thermometer


To make
Gently heat milk and honey together in a pot, stirring to mix in the honey.

Keep an eye on the temperature and take it off the heat at 31 degrees.

If it heats up further, just let it cool to 31 again before you do the rest.

Add a drop (or 2 or 3) of vanilla and stir quickly.

Mix a couple of drops of rennet with a tsp of water.

Stir the rennet/water into the milk for 15 seconds or so.

This is your junket mix. Pour it into bowls and leave to set.

Don't move the junket at all while it's setting. That can break the curd.

Once it's set you can refrigerate it. (Not before.)

Have it plain, or sprinkle on a little nutmeg or cinnamon.

Saturday, November 29, 2008

How to get those little black bugs out of flowers without washing


It's not a recipe, but I stumbled on this idea while tearing my hair out over the hordes of little critters in our elderflowers the other day. I've since used this method with roses as well.

4 reasons not to wash flowers that destined for culinary or medicinal use
1. It can damage the fragile petals

2. Flowers readily release their fragrant/flavoursome/active components into water, and you don't want to wash any of that valuable stuff away

3. If you're making something like wine, where you want plenty of wild yeasts, you don't want to wash yeasts off.

4. I'm not convinced that washing gets all the bugs out anyway. Sometimes I think it just makes them stick to the flowers soggily.


The bugs

I don't know if other people get these exact bugs in their flowers. They are very tiny and black and crawl fast. They are the only creatures I get in my flowers usually. I have no idea what they are, but I don't want too many of them in my cordial or wine or fritters!

Getting rid of them

You need two BIG pale plates or bowls. (Transparent bowls work well too.)

Put the flowers in a pile on one of the plates, and watch the mass exodus! The bugs all start speeding out from the pile of flowers towards the edges of the plate.

Now pick up the flowers, and put them on the other plate. Quickly rinse all the bugs off the first plate, and dry. (Sorry, bugs.)

Now more bugs will be running out to the edges of the second plate, so switch again and rinse and dry.

Keep doing this, switching between the plates. Gradually there will be fewer and fewer bugs coming out.

At a certain point it starts to feel like washing rice - like no matter how many times you do it, you will never quite be finished. But just gently turn or agitate the flowers a bit each time you put them down, and watch for curled petals where bugs might be hiding in a fold, and eventually no more will come out. Then you can remove any final die-hards with your fingers.

There you are - bug-free flowers.

And if you do end up missing just a few, you can always strain them out of the finished flower wine/syrup/cordial ... Or if it's flower fritters you are making, just think of them as a little protein bonus.

Monday, November 24, 2008

Solar-cooked underground vege curry

I was going to call it a root vege curry, but then I realised potatoes and onions are not officially roots, so I had to go a bit more general.


Ingredients
Onions
Potatoes
Kumara
Carrots
Cashew nuts
Your favourite curry powder or paste
Coconut cream
Salt

(Adjust quantities according to taste and how much room you have in your best thin, dark solar-cooking pot. To maximise heat with my solar cooking equipment, I would not fill my pot much more than half full ... but you are the best judge of your own solar cooker's capabilities.)

To make
Chop onions very thinly. Slices 1-2 cm long and 2-3 mm thick have worked best for me

Chop potatoes and kumara into small cubes.

Chop carrots up however you like them, but smallish.

Throw all veges into the pot, along with plenty of cashew nuts.

Add curry powder/paste and stir round to coat veges.

Mix coconut cream with water till it's a thinly syrupy sort of thickness.

Pour the diluted coconut cream over the veges until it nearly covers them but not quite.

Stir the whole mix some more until the curry is well integrated into the sauce.

Add salt to taste.

Seal it all up, put it in your cooker, and leave in the sun for a day.

Solar cooking info
The basics: how solar cookers work

Instructions and plans for making a host of different solar cookers